So....I try to participate in recipe swaps, and this is one that I changed the "card" by adding it onto a 6x6 background and making it into a recipe page for an exchange!
I cut the coffin, letters, and pop out bat on my cutting machine.
The background paper of the 6x6, I used that webbing paint spray, that comes of of the can in a web of paint. I used a gold web spray, and sprayed it on black.
Then, I used a paper with the words "boo" printed all over it.
On top, I attached the coffin card. For the Base of the card, I stamped a spider stamp with versamark ink, then used the powdered pearls over the top, to make it glimmer.
I outlined the letter cutouts with a glitter pen, to add a little dimension.
Instead of a greeting inside, I have a recipe printed...but you could just have your spooky greeting there instead!
Hope you enjoyed, you can visit my blog for other ideas, though I haven't been able to post much lately!
Michelle Hessler
www.paperthreadsblog.com
Showing posts with label Designer: Michelle Hessler. Show all posts
Friday, September 28, 2012
Friday, September 21, 2012
Hugs!
When thinking of kid friendly cards, I typically seem to make more for my nieces and little girls and not so much for boys! I really need to change that thought process!!
Here's one that was a just because, this I sent off to my niece:
I used coordinations card stock and an embossing folder for the green paper, then lightly sanded it down. I used nesties for the stamped image and oval scallop. For the stamped image, I used my nestie and the out of bound technique, which is one of my favorite techniques to use, and I did a you tube video showing how it was done, if you check my channel out at you tube, my user id is Paperthreads.
Enjoy!!
Michelle Hessler
www.paperthreadsblog.com
Labels:
Designer: Michelle Hessler,
Kiddie Card
Tuesday, September 11, 2012
Remembrance
Just interrupting the regular schedule of postings to give a little remembrance to the families of 9/11, and all those that have been profoundly affected by the events of that day.
I'm sure we can all remember what we were doing when the news came through, it was a day that had a large impact on my life, as I knew people the worked in the towers, as well as several people that worked in the Pentagon, as we had just moved from Washington DC, where my daughter attended the Pentagon daycare and preschool center and my husband worked.
Since then, being a military family, we have continued to experience events that all came from that one day....even now, all these years later.
Prayers to all....
I'm sure we can all remember what we were doing when the news came through, it was a day that had a large impact on my life, as I knew people the worked in the towers, as well as several people that worked in the Pentagon, as we had just moved from Washington DC, where my daughter attended the Pentagon daycare and preschool center and my husband worked.
Since then, being a military family, we have continued to experience events that all came from that one day....even now, all these years later.
Prayers to all....
ATC card below cut with my electronic die cutting machine.....picture shows front and back.
Friday, June 29, 2012
Teen past times-sunbathing
Ever since I started using copic markers, I have had such a great time working with them, and practicing my coloring techniques. It's a lot of fun, and has allowed me to really enjoy my stamp collection so much more!
Anyway, I'm still working at filling in my copic journal book with sample projects, and here is the latest that I finally finished up!
I enjoyed putting this one together...and again, all papers were from my scrap bin! I had used these papers about 3 years ago for a "Through the Year" swap, where 12 people each had a month, and made 12 copies of their month, we swapped them out, and ended up with a full album, double page layout for every month of the year. My month was June, so I used the blue and yellow paper to do a "beach" type theme. I love the nice bright colors of that paper!!
RECIPE FOR CARD:

ENTER JUNE'S CHALLENGE:
PAPERS: Detail Blending for stamp base, Scrap papers
INKS: Copics, Memento Ink (Tuxedo Black), Tea Dye Distress Ink
STAMPS: Whiff of Joy: 2010 July Stamp Set - Life's a Beach
ADHESIVE: 3M Adhesive
MISC: Round It All, Scrap ribbon, Daisy Bucket Stamp Phrase, metal flower shaped paper clip
TECHNIQUES: Copic Coloring Techniques
COPIC RECIPE:
Skin: E50, E51, E53, R12
Lips: R05
Clothes: FYG2, W05, FV2
Hair: W2, W4, W6, W8
Glasses: Fv2, W10
Towel: Y00, Y02, Y08, W2 (shadow)
Hope you Enjoy!!
ENTER JUNE'S CHALLENGE:
Labels:
Designer: Michelle Hessler,
Teen
Tuesday, June 19, 2012
Bling, Bling!
Yeppers...lotsa glitter on this gal!
This is the Goldie Stamp from the Loralie Art Stamps that we carry in the store.
CARD RECIPE:
Stamped with Memento Ink on Detail Blending Paper. Used my Copics to color her in...using variations of pink and purple to make the stripes in her overalls. Added opaque white highlights, and some of my AtYou Spica Glitter pens on areas of the flower basked and overalls.
For the card base, I used Autumn Hay Petallics paper, which I stamped with the flower accent stamp that comes with Goldie. I stamped in a variety of reds and orange colors. I then heat set it, just to make sure it didn't smear. I then used my 1/2" Scor Tape, and put a strip of tape, then covered it with glitter. Then repeated this process, using various colors of glitter (light pink, dark pink, and light green.)
I then put small strips of the heart pattern paper from the Pastiche line by SEI. I had the little critter gems from my stash of Joann's embellishments, and the ribbon is one I picked up for a buck at hobby lobby. I used my bow template to make the bow!
Because I used glitter across the whole front of the page, I used the Scor tape to tack the gems, ribbon and stamped image down...as I needed it to be aggressive enough to stick to the glitter strips.
It turned out really cute...and has a LOT of bling!
Michelle Hessler
www.paperthreadsblog.com
ENTER JUNE'S CHALLENGE:
This is the Goldie Stamp from the Loralie Art Stamps that we carry in the store.
CARD RECIPE:
Stamped with Memento Ink on Detail Blending Paper. Used my Copics to color her in...using variations of pink and purple to make the stripes in her overalls. Added opaque white highlights, and some of my AtYou Spica Glitter pens on areas of the flower basked and overalls.
For the card base, I used Autumn Hay Petallics paper, which I stamped with the flower accent stamp that comes with Goldie. I stamped in a variety of reds and orange colors. I then heat set it, just to make sure it didn't smear. I then used my 1/2" Scor Tape, and put a strip of tape, then covered it with glitter. Then repeated this process, using various colors of glitter (light pink, dark pink, and light green.)
I then put small strips of the heart pattern paper from the Pastiche line by SEI. I had the little critter gems from my stash of Joann's embellishments, and the ribbon is one I picked up for a buck at hobby lobby. I used my bow template to make the bow!
Because I used glitter across the whole front of the page, I used the Scor tape to tack the gems, ribbon and stamped image down...as I needed it to be aggressive enough to stick to the glitter strips.
It turned out really cute...and has a LOT of bling!
Michelle Hessler
www.paperthreadsblog.com
ENTER JUNE'S CHALLENGE:
Labels:
Designer: Michelle Hessler,
Just Because
Saturday, June 2, 2012
Summery Birthday Greetings
Birthday greetings tend to start all looking the same! Hopefully this greeting will brighten up your day....and get you thinking of warm tropical weather!! I was in a creative mode...and decided to try to make as many cards as I could in under a half hour, just by using the same set of stamps and colors of papers!
Everything used here is stamping up. I don't remember the names of all the stamps, as I have remounted them all, and at the time I remounted, I didn't think ahead to label them with their stamp set name!
To do the birthday greetings in the first card, I stamped a scrap paper, tore around the greeting, stuck it to the paper, and used that as a mask. Then stamped the flower for a background (stamping off the ink first on scrap paper, and then doing a second stamp on the paper...to give it a faded out look) When done, I removed the mask and then stamped the greeting directly on the card.
Hope you enjoy the card samples! You can join on in our new monthly challenges for June too...see the link below!
ENTER JUNE'S CHALLENGE:
Everything used here is stamping up. I don't remember the names of all the stamps, as I have remounted them all, and at the time I remounted, I didn't think ahead to label them with their stamp set name!
To do the birthday greetings in the first card, I stamped a scrap paper, tore around the greeting, stuck it to the paper, and used that as a mask. Then stamped the flower for a background (stamping off the ink first on scrap paper, and then doing a second stamp on the paper...to give it a faded out look) When done, I removed the mask and then stamped the greeting directly on the card.
Hope you enjoy the card samples! You can join on in our new monthly challenges for June too...see the link below!
ENTER JUNE'S CHALLENGE:
Labels:
Birthday,
Designer: Michelle Hessler
Wednesday, May 23, 2012
A Big Thanks!
The theme this week is thank you's! It couldn't have come at a better time to motivate me to make some card! My son was confirmed this month, it was also his birthday...and so he has a few thank you's to send out!
That being said, the one I'm featuring today is one I made for a friend of mine, it's a bit frilly, but was fun to make!
It was really quite simple to make! For a change, I didn't use a stamp that needed a lot of coloring, but I still found a way to use my copics!
I used a thank you stamp, some nestabilities, ric rac ribbon, scrap papers and a fiber mesh material, which I airbrushed to give it some color depth. Then the peals glued in place, and it's done!
Quick and easy, and easy enough to pop out a dozen of them at one time!
See my blog for full details!
Happy Card Making!
Michelle Hessler
ENTER MAY'S CHALLENGE:
That being said, the one I'm featuring today is one I made for a friend of mine, it's a bit frilly, but was fun to make!
It was really quite simple to make! For a change, I didn't use a stamp that needed a lot of coloring, but I still found a way to use my copics!
I used a thank you stamp, some nestabilities, ric rac ribbon, scrap papers and a fiber mesh material, which I airbrushed to give it some color depth. Then the peals glued in place, and it's done!
Quick and easy, and easy enough to pop out a dozen of them at one time!
See my blog for full details!
Happy Card Making!
Michelle Hessler
ENTER MAY'S CHALLENGE:
Labels:
Designer: Michelle Hessler,
Thank You
Tuesday, May 15, 2012
Fishing for Dad
Father's Day cards just aren't as easy to make as Mother's day! I think it just has to do with the fact that most of us card makers are women, and we can completely get into the feminine side of card making, and so that makes it harder to get into our less frilly self!
Here is a great card for that Fishing Fanatic in the house...either for Dad or Grandpa!
The shaped card is from a file in a Great Outdoors Collection of diecut files, and can be purchased individually too....at the Paperthread's Store.
It's easy to put together....you cut and layer the pieces, and you can either cut the dashed lines, and then highlight with color or ink, or hand draw the lines, giving a stitching effect.
I also used a small fishing lure stamp on the inside of the card, you can see just a slight bit of it in the bottom right corner!
Hope you enjoy!!
ENTER MAY'S CHALLENGE:
Here is a great card for that Fishing Fanatic in the house...either for Dad or Grandpa!
The shaped card is from a file in a Great Outdoors Collection of diecut files, and can be purchased individually too....at the Paperthread's Store.
It's easy to put together....you cut and layer the pieces, and you can either cut the dashed lines, and then highlight with color or ink, or hand draw the lines, giving a stitching effect.
I also used a small fishing lure stamp on the inside of the card, you can see just a slight bit of it in the bottom right corner!
Hope you enjoy!!
ENTER MAY'S CHALLENGE:
Labels:
Designer: Michelle Hessler,
Father's Day
Tuesday, April 24, 2012
Spring is in the Air!
Yes, indeed...it is such a beautiful spring so far! It motivated me to get another card done for the Card a Day Blog!
Today's card, I used some colored Memento Ink Pad, and grabbed some flower stamps from my collection of stamps. I believe the one's I chose are all Daisy Bucket Stamps (Daisy Bucket line is no longer produced, and I bought up a ton of their stamps when they had the going out of business sale!)
Enjoy!! And don't forget to join in on the challenge this month, or hit the Color Challenge on my blog, www.paperthreadsblog.com
ENTER APRIL'S CHALLENGE:
Today's card, I used some colored Memento Ink Pad, and grabbed some flower stamps from my collection of stamps. I believe the one's I chose are all Daisy Bucket Stamps (Daisy Bucket line is no longer produced, and I bought up a ton of their stamps when they had the going out of business sale!)
Enjoy!! And don't forget to join in on the challenge this month, or hit the Color Challenge on my blog, www.paperthreadsblog.com
ENTER APRIL'S CHALLENGE:
Labels:
Designer: Michelle Hessler,
Spring
Friday, April 6, 2012
Teacher Appreciation in a Tote
My children are all grown....or practically it seems! My youngest is now an 8th grader, and at this age, we no longer do a "teacher appreciation", as there are so many teachers, and it's just "not cool" to bring in gifts for the teacher at this age....especially for a boy!
So....instead of doing a new post, I'm showing a post from a couple years ago, when my son was in 6th grade, and it was still cool to recognize your teachers!
I had to make a "teacher appreciation" gift, as it's teacher appreciation week, and tonight I have parent-teacher conferences.
So, I found an idea on Papertrey Ink blog on making a cupcake tote.
I decided I could do something like this for Cameron's teacher! Only I adapted it with what supplies I had on hand!
Here is a picture of the project above. Part of what I adapted differently is I used a pattern to cut Cupcake wrappers instead of doing an additional bag of sweet toppers for the cupcakes. I also made a "matching" card, kept it to spring/easter colors, and I didn't have my own little tubes and didn't have time to order from them, so I created my own from a transparency film and some yellow cardstock!
When you open the flap, you will find the candy toppers....filled in tubes. I cut 3"x5" rectangles from a yellow transparency material I had. I then used Scor Tape along one 5" end, and rolled the other end onto it, forming the tube. For the toppers, I cut a circle pattern on my machine (about 3/4" size) with triangles off the circle to make "tabs" I taped the tabs down onto the tube with my score tape. I then added a small strip of matching yellow paper around the circumference of the top, to create the "cap" look.
The Bunny paper piecing is from my Easter Bunny File
Here is my full recipe list!! It's a long one...so be prepared!
TOTE:
Paper: Cascata Yellow (12x12 - 3 sheets), pattern papers from SEI Chick-a-dee collection (one sheet of Anna's Bananas, and one sheet of Ga-ga), DoubleMates Brown paper for Bunny pieced together.
Other: Ribbon by Offray, 1/2" Score Tape to secure Ribbon, 1/8" score tape for sides of box attachment and for paper strip holding candy tubes in place, as well as the caps of the candy tubes. I also used the Labels 10 Nestie for the matting under the easter bunny, and to create the flap at the top of the box to close it up. I used a strip of velcro for the closure. Transparency film for the tubes with paper topper. I also covered the frosting tub with the papers and ribbon to match.
The cupcake wrappers were cut from Cascata Paper on my KNK, from a pattern provided by Judy on the KNK Yahoo Group. I was going to make my own pattern...but her's fit the bill perfectly, and I figured why make it even more work!! (So thanks for the pattern Judy!)
Card:
Detail Blending paper for the Itzy Inkies Flower Power Stamp, Copics, Nestabilities Labels Set, Border file cut from my KNK Machine (cut twice, from white and scraps of the SEI papers used on the tote)
UPDATE ON GIFT....his teacher LOVED IT! She has 3 young boys, and they made the cupcakes prior to Easter, and ate them for dessert on Easter Sunday!
Make sure you join in on the fun, and get an opportunity to win a GREAT prize package, by joining our April Challenge!
ENTER APRIL'S CHALLENGE:
So....instead of doing a new post, I'm showing a post from a couple years ago, when my son was in 6th grade, and it was still cool to recognize your teachers!
So, I found an idea on Papertrey Ink blog on making a cupcake tote.
I decided I could do something like this for Cameron's teacher! Only I adapted it with what supplies I had on hand!
Here is a picture of the project above. Part of what I adapted differently is I used a pattern to cut Cupcake wrappers instead of doing an additional bag of sweet toppers for the cupcakes. I also made a "matching" card, kept it to spring/easter colors, and I didn't have my own little tubes and didn't have time to order from them, so I created my own from a transparency film and some yellow cardstock!
When you open the flap, you will find the candy toppers....filled in tubes. I cut 3"x5" rectangles from a yellow transparency material I had. I then used Scor Tape along one 5" end, and rolled the other end onto it, forming the tube. For the toppers, I cut a circle pattern on my machine (about 3/4" size) with triangles off the circle to make "tabs" I taped the tabs down onto the tube with my score tape. I then added a small strip of matching yellow paper around the circumference of the top, to create the "cap" look.
The Bunny paper piecing is from my Easter Bunny File
Here is my full recipe list!! It's a long one...so be prepared!
TOTE:
Paper: Cascata Yellow (12x12 - 3 sheets), pattern papers from SEI Chick-a-dee collection (one sheet of Anna's Bananas, and one sheet of Ga-ga), DoubleMates Brown paper for Bunny pieced together.
Other: Ribbon by Offray, 1/2" Score Tape to secure Ribbon, 1/8" score tape for sides of box attachment and for paper strip holding candy tubes in place, as well as the caps of the candy tubes. I also used the Labels 10 Nestie for the matting under the easter bunny, and to create the flap at the top of the box to close it up. I used a strip of velcro for the closure. Transparency film for the tubes with paper topper. I also covered the frosting tub with the papers and ribbon to match.
The cupcake wrappers were cut from Cascata Paper on my KNK, from a pattern provided by Judy on the KNK Yahoo Group. I was going to make my own pattern...but her's fit the bill perfectly, and I figured why make it even more work!! (So thanks for the pattern Judy!)
Card:
Detail Blending paper for the Itzy Inkies Flower Power Stamp, Copics, Nestabilities Labels Set, Border file cut from my KNK Machine (cut twice, from white and scraps of the SEI papers used on the tote)
UPDATE ON GIFT....his teacher LOVED IT! She has 3 young boys, and they made the cupcakes prior to Easter, and ate them for dessert on Easter Sunday!
Make sure you join in on the fun, and get an opportunity to win a GREAT prize package, by joining our April Challenge!
ENTER APRIL'S CHALLENGE:
Tuesday, March 20, 2012
Thinking of Some Bunny!
Well...it's that time of year, the sun has been shining, the grass is turning green, and the leaves on the trees are already budding.
Actually a little early for this area this time of year, but I'm enjoying it just the same!
The family and I took in a little time to do some trout fishing, it was GREAT FUN!! Got a little sun burn, but don't mind, felt good catching all that sun! (Oh, and we did catch a few fish too!)
Thank you to all who joined in on our great SPRING HAS SPRUNG blog hop yesterday...there is still time to comment on the various blog to be eligible for the drawing of the grand prize! So hope you stop in and do that!
My card today is spring like, and can easily be used with this weeks theme, "Thinking of You"
I have been slowly but surly using my scraps up this past year, really trying to dig in and not buy more papers or materials until I make a decent dent in my current stash! The charms were some "JoAnns" dollar buys which I picked up probably about 5 years ago! The stamp is a Stampavie one....I colored it with my copics, trying to achieve the furry look of my bunny friends!
I had a lot of fun with this card, mainly because, I like trying different techniques with my copics, and it was one of my first time trying fur.
Hope you Enjoy!
Michelle Hessler
www.paperthreadsblog.com
ENTER MARCH CHALLENGE:
Actually a little early for this area this time of year, but I'm enjoying it just the same!
The family and I took in a little time to do some trout fishing, it was GREAT FUN!! Got a little sun burn, but don't mind, felt good catching all that sun! (Oh, and we did catch a few fish too!)
Thank you to all who joined in on our great SPRING HAS SPRUNG blog hop yesterday...there is still time to comment on the various blog to be eligible for the drawing of the grand prize! So hope you stop in and do that!
My card today is spring like, and can easily be used with this weeks theme, "Thinking of You"
I have been slowly but surly using my scraps up this past year, really trying to dig in and not buy more papers or materials until I make a decent dent in my current stash! The charms were some "JoAnns" dollar buys which I picked up probably about 5 years ago! The stamp is a Stampavie one....I colored it with my copics, trying to achieve the furry look of my bunny friends!
I had a lot of fun with this card, mainly because, I like trying different techniques with my copics, and it was one of my first time trying fur.
Hope you Enjoy!
Michelle Hessler
www.paperthreadsblog.com
ENTER MARCH CHALLENGE:
Friday, March 9, 2012
Baby Bottle Shaped card
This weeks designer challenge at the Card a Day Blog is baby cards!
Several years ago, when I first got my very first die cut machine (electronic based) I made a collection of "card files"
This is one of those files...perfect for a new baby, baby announcement, baby congratulations, or whatever! You can change the outside panel, which is of a train....to a small picture of the new baby.
It's a "shaker" card, but you can actually choose to not cut the inside opening out, and leave it as a full card with no shaker box, whichever is easier to make or meets your needs!
The card can be found at my website, here:
http://www.paperthreads.com/store/index.php?main_page=product_info&cPath=66_70&products_id=3708
It includes assembly directions, and is very easy to put together!
Michelle Hessler
www.paperthreadsblog.com
ENTER MARCH CHALLENGE:
Several years ago, when I first got my very first die cut machine (electronic based) I made a collection of "card files"
This is one of those files...perfect for a new baby, baby announcement, baby congratulations, or whatever! You can change the outside panel, which is of a train....to a small picture of the new baby.
It's a "shaker" card, but you can actually choose to not cut the inside opening out, and leave it as a full card with no shaker box, whichever is easier to make or meets your needs!
The card can be found at my website, here:
http://www.paperthreads.com/store/index.php?main_page=product_info&cPath=66_70&products_id=3708
It includes assembly directions, and is very easy to put together!
Michelle Hessler
www.paperthreadsblog.com
ENTER MARCH CHALLENGE:
Labels:
Baby,
Designer: Michelle Hessler
Friday, February 24, 2012
Wedding Invite Idea
Die cut machine to the rescue!!
Yes, I have had several opportunities for making wedding invitations for friends and family! It's funny, I never thought I would cut something, and design something that important (and boy did I have everyone proof read everything to make sure!)
I have made 5 wedding invitations for family and friends over the last couple years! Here is one I did a couple years ago, for a friends daughter.
They were under a really tight budget, so we bought the paper in bulk, and used my cutting machine (KNK Maxx) and away we went!
The card is made from a turquoise card base, with the black piece cut so there was a square window and rose cut out. This was glued to the top of the turquoise base. Then, the printed square of their names was glued evenly inside the cut out square! (3 pieces total making up the outside of the card!) For the glue, we used a combination of ATG gun for the straight edges of the cad, and scotch quick glue, and just dabbed a couple in place on the thin part of the rose cut out, then placed on the base. The printed square was put through a Xyron 9" runner, then trimmed and stuck into place.
The inside base of the card was printed, trimmed and placed on the inside of the card. Super easy to do and using my ATG gun, took next to no time to place them all!
In order to get the information on the hotels, RSVP and bridal registry, we did a small "bookmark" type insert. We used the same rose cut out, and turned it into a printed rose, then cut one piece of book mark, and glued hotel info on one side of it, and then the RSVP and bridal registry went onto the second side!
It's so easy to use your electronic die cutters to get these things made! We made 175 wedding invitations for this wedding, it took about 7 hours all together (3 of us working on it) to cut and assemble them all. And the total cost for the invitations was $108!! That included the envelopes and paper (and the paper had a nice texture on it too, making it more elegant!) We simplified the pattern as much as possible, where it still looked fancy, but was cut in just a few pieces for easy assembly!
Hope you enjoyed!
Michelle Hessler
www.papertheadsblog.com
ENTER FEBRUARY CHALLENGE:
Yes, I have had several opportunities for making wedding invitations for friends and family! It's funny, I never thought I would cut something, and design something that important (and boy did I have everyone proof read everything to make sure!)
I have made 5 wedding invitations for family and friends over the last couple years! Here is one I did a couple years ago, for a friends daughter.
They were under a really tight budget, so we bought the paper in bulk, and used my cutting machine (KNK Maxx) and away we went!
The card is made from a turquoise card base, with the black piece cut so there was a square window and rose cut out. This was glued to the top of the turquoise base. Then, the printed square of their names was glued evenly inside the cut out square! (3 pieces total making up the outside of the card!) For the glue, we used a combination of ATG gun for the straight edges of the cad, and scotch quick glue, and just dabbed a couple in place on the thin part of the rose cut out, then placed on the base. The printed square was put through a Xyron 9" runner, then trimmed and stuck into place.
In order to get the information on the hotels, RSVP and bridal registry, we did a small "bookmark" type insert. We used the same rose cut out, and turned it into a printed rose, then cut one piece of book mark, and glued hotel info on one side of it, and then the RSVP and bridal registry went onto the second side!
It's so easy to use your electronic die cutters to get these things made! We made 175 wedding invitations for this wedding, it took about 7 hours all together (3 of us working on it) to cut and assemble them all. And the total cost for the invitations was $108!! That included the envelopes and paper (and the paper had a nice texture on it too, making it more elegant!) We simplified the pattern as much as possible, where it still looked fancy, but was cut in just a few pieces for easy assembly!
Hope you enjoyed!
Michelle Hessler
www.papertheadsblog.com
ENTER FEBRUARY CHALLENGE:
Labels:
Designer: Michelle Hessler,
Wedding
Friday, February 17, 2012
St. Paddys....halfway through FEB!
It is so hard to believe we are over halfway through Feb!
I had planned on doing a new card for this week, but life got in the way unexpectedly! I ended up with my nieces here this week to stay....and let me tell you, i'm feeling my age!
They are awesome to have, but I'm definitely out of shape in the parenting of babies and toddlers! A 2.5 year old and 9 month old are whipping my backside!
Though it has been extremely fun!
Anyway...here is a card I did a couple years ago, using one of those Lace pattern brass templates. I don't even know if they sell them exactly like that any more! But what I did do is take some Rub-Onz and create the sentiment on there, as I had left it blank!
Not my best work, but when in a jam, it's always nice to have some standard card fronts available for just such an emergency!
ENTER FEBRUARY CHALLENGE:
I had planned on doing a new card for this week, but life got in the way unexpectedly! I ended up with my nieces here this week to stay....and let me tell you, i'm feeling my age!
They are awesome to have, but I'm definitely out of shape in the parenting of babies and toddlers! A 2.5 year old and 9 month old are whipping my backside!
Though it has been extremely fun!
Anyway...here is a card I did a couple years ago, using one of those Lace pattern brass templates. I don't even know if they sell them exactly like that any more! But what I did do is take some Rub-Onz and create the sentiment on there, as I had left it blank!
Not my best work, but when in a jam, it's always nice to have some standard card fronts available for just such an emergency!
ENTER FEBRUARY CHALLENGE:
Labels:
Designer: Michelle Hessler
Friday, February 10, 2012
Jammin' to Music
Head to any school yard, before or after school, and you'll see the same common site...kids with headphones in their ears and their MP3 players jamming! Sometimes I think they have it so loud that you can hear their music from a mile away!
I thought this stamp from Greeting Farm would make a GREAT card for every day things for that teen near you. You can use it for Birthdays, Special days, Thinking of you, or more!
I think this is my favorite color combination for brown hair! You can't see it, but i also use a clear spica pen on her eye lids, so she is wearing "glittery eye makeup"....very trendy!
RECIPE FOR CARD:
ADHESIVE: 3M Adhesive, Pop dots
MISC: Stamp Phrase unknown, Round It All, Nestability Flowers
TECHNIQUES: Copic Coloring Techniques
I thought this stamp from Greeting Farm would make a GREAT card for every day things for that teen near you. You can use it for Birthdays, Special days, Thinking of you, or more!
I think this is my favorite color combination for brown hair! You can't see it, but i also use a clear spica pen on her eye lids, so she is wearing "glittery eye makeup"....very trendy!
RECIPE FOR CARD:
PAPERS: Detail Blending for stamp base, Scrap papers from Kaiser Craft
INKS: Copics, Memento Ink (Tuxedo Black), At You Spica, Smooch, Weathered Wood Distress Ink
STAMPS: The Greeting Farm: Wild Sprout Chelsea ADHESIVE: 3M Adhesive, Pop dots
MISC: Stamp Phrase unknown, Round It All, Nestability Flowers
TECHNIQUES: Copic Coloring Techniques
COPIC RECIPE:
Skin: E50, E51, E53, B52, At You Spica
Clothes: R37, R39, At You Spica
Hair: E53, E25, E59, E49
IPOD: B69, At You Spica
Labels:
Designer: Michelle Hessler,
Just Because
Sunday, February 5, 2012
Super Bowl Blog Hop and a Guy kinda Invite
LOTS going on today!! If you didn't know...we are hosting a blog hop this weekend of fun and goodies!
The theme for the blog hop is "Masculine"...you can take a peek at everyone's blog, post a comment and join in on the various prizes being offered! We are offering a GRAND prize too! To enter into the grand prize, comment on this post...and comment on the blog posts throughout the hop! EACH comment will get you one entry into the grand prize!
Here is what you can win:
PLEASE NOTE: We will ship this prize to anywhere in the U.S. Anyone who wins from out of country will have their choice to pay for the shipping of the prize or get a $10 gift certificate prize of digital download files from the Paperthreads Store!
My submission to the blog hop has to be a masculine themed card, and since this week's theme is "invitations" I wanted to incorporate both into today's post!
The first thing, of course, was I got out my copics, and had a grand time coloring my stamped image! I then used flock for the eye patch, smooch for the earring, buttons, buckle, edge of treasure chest. I used Rock Candy distress crackle for the skull and treasure chest. I then had some metal charms, which I used my copics and copper mixative by tim holtz, to distress the metal charm. I then sanded it down a little, so it looked like an old treasure charm found in the treasure chest, and that someone rubbed on it, to reveal the "words." I used some Grafix Rub On sheets to create the "You're Invited" and rubbed that onto the metal charm. For the exact card recipe, make sure you visit my blog as part of the blog hop....and I'm offering a prize over there too!!
So JOIN IN TODAY....comment on the main blog page, and visit the other hop pages and comment there too and you will get in on all the prize drawings!!
The theme for the blog hop is "Masculine"...you can take a peek at everyone's blog, post a comment and join in on the various prizes being offered! We are offering a GRAND prize too! To enter into the grand prize, comment on this post...and comment on the blog posts throughout the hop! EACH comment will get you one entry into the grand prize!
Here is what you can win:
PLEASE NOTE: We will ship this prize to anywhere in the U.S. Anyone who wins from out of country will have their choice to pay for the shipping of the prize or get a $10 gift certificate prize of digital download files from the Paperthreads Store!
My submission to the blog hop has to be a masculine themed card, and since this week's theme is "invitations" I wanted to incorporate both into today's post!
The first thing, of course, was I got out my copics, and had a grand time coloring my stamped image! I then used flock for the eye patch, smooch for the earring, buttons, buckle, edge of treasure chest. I used Rock Candy distress crackle for the skull and treasure chest. I then had some metal charms, which I used my copics and copper mixative by tim holtz, to distress the metal charm. I then sanded it down a little, so it looked like an old treasure charm found in the treasure chest, and that someone rubbed on it, to reveal the "words." I used some Grafix Rub On sheets to create the "You're Invited" and rubbed that onto the metal charm. For the exact card recipe, make sure you visit my blog as part of the blog hop....and I'm offering a prize over there too!!
So JOIN IN TODAY....comment on the main blog page, and visit the other hop pages and comment there too and you will get in on all the prize drawings!!
Labels:
Designer: Michelle Hessler,
Invitations
Tuesday, January 24, 2012
Anya Nurse...Get Well
Seems like so many people I know have been getting sick lately, that's
I've been running out of some get well soon cards...so I'm trying to
restock my pile!
STAMPS: The Greeting Farm: Nurse Anya, phrase stamp from Daisy Bucket
ADHESIVE: 3M Adhesive
MISC: ribbon scrap, Color Me Crazy Flowers
TECHNIQUES: Copic Coloring Techniques, Copic Air Brush (flowers)
RECIPE FOR CARD:
PAPERS: Detail Blending for digi stamp base, Scrap papers
INKS: Copics, Memento Ink (Tuxedo Black)
ADHESIVE: 3M Adhesive
MISC: ribbon scrap, Color Me Crazy Flowers
TECHNIQUES: Copic Coloring Techniques, Copic Air Brush (flowers)
COPIC COLORS:
Hair: E53, E25, E59, E49
Nurse Hat: W00, W01, R22, R27
Glass(Tray): B10
Uniform: W00, W01
Shoes: W06, W08
Skin: E30, E31, E33, R22
Hope you enjoy this project, stop by tomorrow, and Tina will inspire you with another Get Well project!
Also, don't forget to enter our monthly challenge! It's super easy to enter!
Michelle Hessler
www.paperthreadsblog.com
ENTER CHALLENGE:
Labels:
Designer: Michelle Hessler,
Get Well
Friday, January 20, 2012
Thank You, Thank You!
Welcome to a great new beginning of the new year! Hopefully it's all going well with you so far!
Each year, I have the good intentions of sending out thank you cards for various events, such as going to dinner once a month in a dinner group we are a part of, or to someone who may have done something different or special for me in the month! So I try to have a pile of thank you cards in my stash!
Here is one such card currently sitting in my stash!
I'm totally in love with this stamp! It's one of my favorites in my collection of stamps, because it's so versatile, can be used for thank yous, thinking of yous, friendship, and so much more! The stamp is from CC Designs, and is an Itzie Inkie: Flower Power! I colored the stamp in with my copic markers, and then I used the out of bounds technique that I made a video on how to do, and can be found here:
I also used a stamp by Stampin' Up for the Thank you, and I used scrap papers and ribbon for the rest of the card. For the punched border, I created that "border" design in my cutting program and cut from my KNK Maxx.
Hope you enjoy this project!
Make sure you get your projects posted into our challenge this month!! We love to see new entries and giving away that prize at the end of the month!!
Each year, I have the good intentions of sending out thank you cards for various events, such as going to dinner once a month in a dinner group we are a part of, or to someone who may have done something different or special for me in the month! So I try to have a pile of thank you cards in my stash!
Here is one such card currently sitting in my stash!
I'm totally in love with this stamp! It's one of my favorites in my collection of stamps, because it's so versatile, can be used for thank yous, thinking of yous, friendship, and so much more! The stamp is from CC Designs, and is an Itzie Inkie: Flower Power! I colored the stamp in with my copic markers, and then I used the out of bounds technique that I made a video on how to do, and can be found here:
I also used a stamp by Stampin' Up for the Thank you, and I used scrap papers and ribbon for the rest of the card. For the punched border, I created that "border" design in my cutting program and cut from my KNK Maxx.
Hope you enjoy this project!
Make sure you get your projects posted into our challenge this month!! We love to see new entries and giving away that prize at the end of the month!!
ENTER CHALLENGE:
Labels:
Designer: Michelle Hessler,
Thank You
Monday, December 19, 2011
Greetings! December 19th
Christmas is such a fun time of year, for everyone, including our pets!
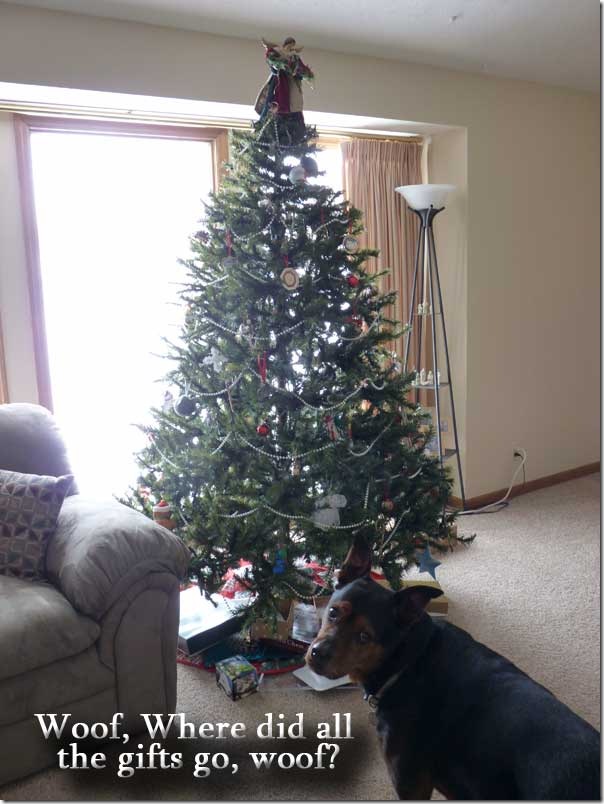
When Michelle Hessler of Paperthreads sent in her Christmas Tree picture, I had a chuckle when I opened it up to see the expression on her dog’s face. The phrase just goes so well with the picture! Sometimes I think it’s a good thing that we don’t know what the four legged members of our families are actually thinking!
The note from Michelle that came with the picture:
"I know…it’s not a serious saying or anything….but I had the kids go through the pictures, and this is what they came up with. Our dog pictured here was named Riggs, and this was to be our last Christmas with him. The kids still cherish any pictures of him, and he was always such a poser!"
When Michelle Hessler of Paperthreads sent in her Christmas Tree picture, I had a chuckle when I opened it up to see the expression on her dog’s face. The phrase just goes so well with the picture! Sometimes I think it’s a good thing that we don’t know what the four legged members of our families are actually thinking!
The note from Michelle that came with the picture:
"I know…it’s not a serious saying or anything….but I had the kids go through the pictures, and this is what they came up with. Our dog pictured here was named Riggs, and this was to be our last Christmas with him. The kids still cherish any pictures of him, and he was always such a poser!"
| Michelle Hessler
Come back tomorrow for another designer’s tree and sentiment! And remember, we will be returning January 2nd, 2012 with more daily card making ideas!
|
| Chris Durnan |
Friday, November 25, 2011
Happy Garden Girl....
Sometimes you have to dig in deep and use up those scraps! lately, I have been promising myself I would not buy new papers until I go through my scrap bins and get those piles down to half their size. let me tell you, that means I could be making cards every day for a full year using my scraps before I allow myself to buy new paper! Yes, my scraps piles are THAT large!
I store my scraps in plastic carts, and separate by color groups and then holiday, specialty (like vellum, flocked paper, mirror paper, etc), pattern, stripes (I use a lot of stripes!) Anyway, we'll see if I can bring the pile of scraps to a more reasonable level!
This stamped image was fun to color....and I found some great scraps in my stash to go with her!
ADHESIVE: 3M Adhesive
MISC: ribbon scrap, Nestabilities, Color Me Crazy Flowers, Smooch
TECHNIQUES: Copic Coloring Techniques, Out of Bounds Technique, Copic Air Brush (on flower)
I store my scraps in plastic carts, and separate by color groups and then holiday, specialty (like vellum, flocked paper, mirror paper, etc), pattern, stripes (I use a lot of stripes!) Anyway, we'll see if I can bring the pile of scraps to a more reasonable level!
This stamped image was fun to color....and I found some great scraps in my stash to go with her!
RECIPE FOR CARD:
PAPERS: Detail Blending for digi stamp base, Scrap papers
INKS: Copics, Memento Ink (Tuxedo Black), Memento Ink (Paris Dusk)
STAMPS: The Greeting Farm: Rock the Farm, phrase stamp from Daisy BucketADHESIVE: 3M Adhesive
MISC: ribbon scrap, Nestabilities, Color Me Crazy Flowers, Smooch
TECHNIQUES: Copic Coloring Techniques, Out of Bounds Technique, Copic Air Brush (on flower)
COPIC COLORS:
Hair: E13, E55, E59
Hat: Y0000, Y02, RV14, RV19
Scarf/Bows: RV14, RV19
Overalls: B00, B02, B05
Buckets: C00, C02, C04
Skin: E0000, E000, E01, R12
Hears on Hat/Pail: Taffy Smooch
A couple of years ago, I did a video about how to do the Out of Bounds Technique using Nestabilities....here is that video, which you may find helpful!
That's if from me today! Scrap on my friends!
Michelle Hessler
Labels:
Designer: Michelle Hessler,
Just Because
Subscribe to:
Posts (Atom)